This assignment requires the installed version of Adobe Photoshop. If you do not have Adobe Photoshop installed in your computer, you can download it from Adobe Website - https://creative.adobe.com/products/photoshop
1) Open the image you wish to clean up. Adobe Photoshop supports all image formats like JPG, GIF, PNG, TIFF, BMP etc. Image can be opened either via menu options - File > Open or by hitting the Ctrl + O keys from the keyboard,
You can observe the desired image opened in the Photoshop editor as scanned (with dust and without enough adjustments)
2) One of the quickest way to reduce the amount of correction work you need to do on any image is a simple crop. So make that your first step. Alternatively you can select the portions of the image you wish to clean up using the selection tool.
Next zoom to 100% magnification so you are viewing actual pixels. The quickest way to 100% zoom is Alt-Ctrl-0 or double-clicking on the zoom tool, depending on whether your hand is on the keyboard or the mouse.
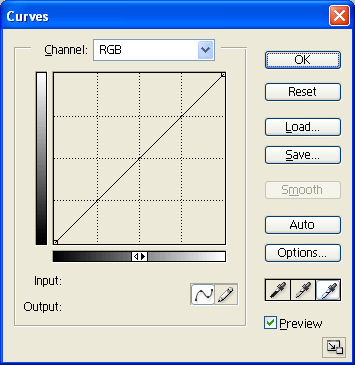
3) From the menu, click Image > Adjustments > Curves or by hitting the keys Ctrl + M from your keyboard to open Curves window,
3) In the curves window set to RGB (Red, Green and Blue) channel - you can see three ink filler like icons above the preview check box,
4) Click on the extreme right ink filler icon - when you mouse over the icon you can notice the rollover text as "Set White Point",
5) Make sure the preview check box is checked, otherwise the changes made in the channel window will not get reflected in the image,
6) Pick a point in the image using the ink filler icon representing "set white point" where there is more accumulation of dark layers (dust),
7) Once you are satisfied with the output seen in the preview, you can click OK from the Curves window,
You can observe the image clarity improved and dust and specks which were earlier removed from the visibility.
Repeat the steps again for further detail.
This is a short technique to remove the black layers from the image, which can be done in less than 30 seconds.
BEFORE

CURVES

AFTER

About Author / Additional Info:

